About Author
Dawn Wilson
Community Learning Specialist
Here at Do Space, “access” is one of the most important services we provide. With a free Do Space membership, you get access not only to computers and software you may not have at home but also to makerspace equipment in the 3D Lab. Whether you are a beginning crafter who just wants to create cool woodcut ornaments from purchased patterns, the family historian looking for a way to etch the name and date of a family wedding in the glass of a framed photo to commemorate the occasion, or you are a local entrepreneur or small business owner who wants to try new projects and equipment, Do Space is here to give you access to the software and equipment you need!
Use of the equipment is free; just bring your own wood, paper, fabric, etc. for the Glowforge, CNC router, Sizzix, and Cricut (with optional mug press and heat press). There is a small fee of $.10/gram for the filament for the 3D printers.
Today, we have asked one of our local entrepreneurs to offer you some tips and advice on using the Glowforge. Alexa took her graphic design skills and used access to the Glowforge to start her own woodcrafting business.
Q: Your laser cut projects can be pretty intricate. How long has it taken you to get to this point?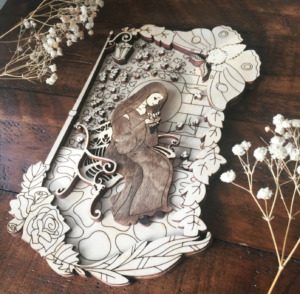
Alexa: I have been laser cutting here for a year, and have learned a lot along the way.
Q: Would you be willing to share some tips for new users who might find the idea of a laser cutter to be intimidating?
Alexa: The Universal laser cutter and Glowforge are relatively easy to learn (especially the latter). YouTube tutorials are your friend. That said, don’t expect everything to go right all the time. As I write this, I got an error on the Glowforge. I’ve learned to roll with the Glowforge’s whims, and appreciate the cool things it can do.
Q: What is the biggest tip you have for a beginner learning to both cut and etch ornaments or wood designs like you do?
Alexa: Don’t move your piece until you know it has been cut all the way through. You may need to cut one more time! Especially if you are cutting around an engrave you spent a lot of time on, you don’t want to misalign your work.
Q: What would you tell someone who was new to laser cutting and finding the results can be hit or miss?
Alexa: Keep trying!! It took me a month or two to make a project I was happy with. Before that, I was testing different materials and settings. I felt like I spent all that time with nothing to show for it. What I was getting from this time spent was experience.
Q: Do you create your designs digitally or on paper first?
Alexa: I sketch my own product designs which are inspired by my faith, then recreate everything in vector format in Adobe Illustrator. 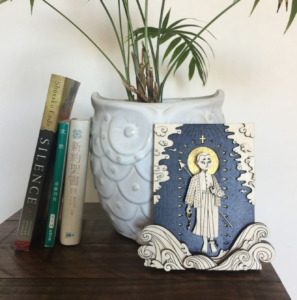
Q: Can you give us an overview of the process once you have your design file loaded into the Glowforge software?
Alexa: I apply a laser-safe masking tape to my baltic birch plywood. After cutting, I remove the tape, and the wood is free of burn marks underneath it. Then I assemble the layers of wood using wood glue and clamps. I have been experimenting with using string, watercolors, and acrylic paint in my work for visual interest. Finally, I protect the wood with a water-based sealant.
Q: Any last comments you would like to share?
Alexa: I’m so grateful for the Do Space, which lets me create things I wouldn’t be able to otherwise. Having access to the Glowforge every week in the 3D Lab has let me be creative and start a new business. I appreciate Do Space’s generous hours. I can work around my busy schedule as a mom of a toddler.
Q: Thank you for sharing these tips, and photos of your projects, Alexa!
You can see more of Alexa’s projects on Instagram, Pinterest, and Etsy @SaintlyWoodcrafts, and in her portfolio at https://alexahorn.wixsite.com/portfolio.